
FindBugs, a static analysis tool (part 2/4)
In the previous article, you have learned some bases in static analysis and how it can be used to improve code quality. Today, I will present FindBugs, one of the most known static analyzers for Java.
![]()
Introduction
FindBugs is an open source software that looks for bugs in java bytecode using static analysis. It has been developped by William Pugh from the University of Maryland in 2003. Its current version is 2.0.1 and can detect more than 400 programming mistakes in the following categories:
- Bad practice
- Correctness
- Internationalization
- Malicious code vulnerability
- Multithread correctness
- Performance
- Security
- Dodgy code
Start guide
FindBugs can be used in different forms :
- Standard tool: GUI, Ant, command line
- Plugins: Eclipse, Maven, Hudson, Intellij, Netbeans
I will focus in this part on the Eclipse plugin, there should be no difference though in the results and uses.
How to install the eclipse plugin
In your eclipse window menu, select Help => Install New Software… => add site :
- http://findbugs.cs.umd.edu/eclipse update site for official releases
- http://findbugs.cs.umd.edu/eclipse-candidate update site for candidate releases and official releases
- http://findbugs.cs.umd.edu/eclipse-daily update site for all releases, including developmental ones
How to use it
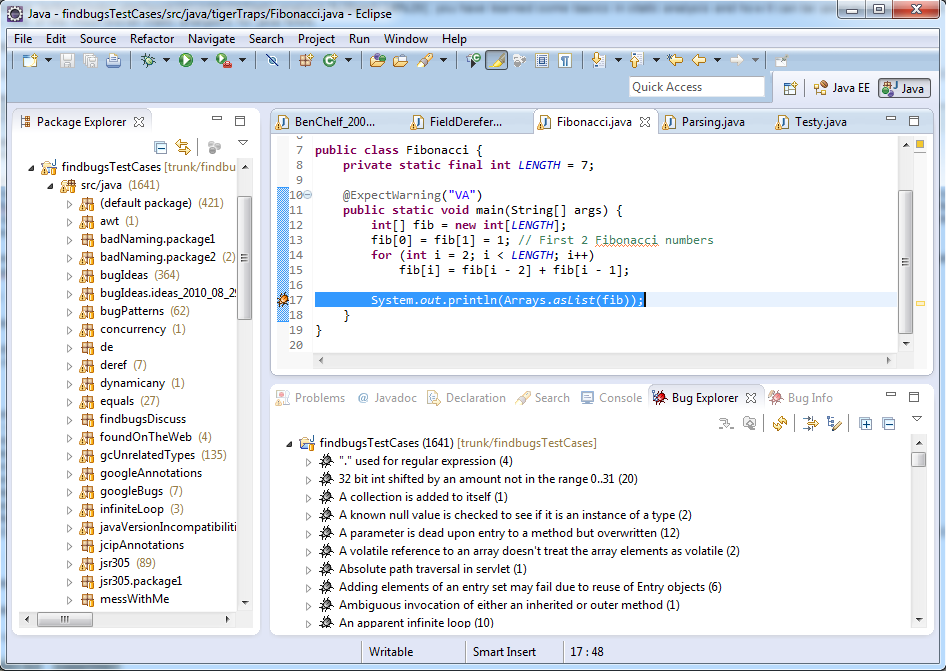
Once installed, findbugs can be directly run on your project or class(es) with right-click => Find Bugs => Find Bugs.
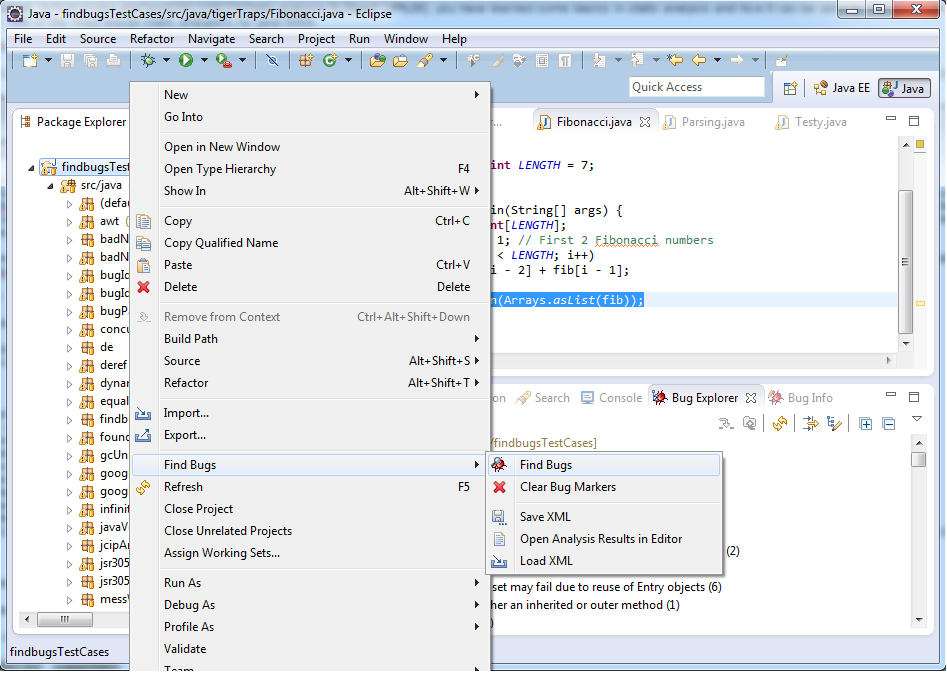
When a bug is found, it can be viewed either by selecting it (the bug icon on the left) or by opening manually the Bug Explorer and Bug Tracker views. The first view present all the bugs found for the given project(s), the second one details each bug.
FindBugs can be « tuned » along with project Properties => FindBugs or workspace Preferences => java => FindBugs.
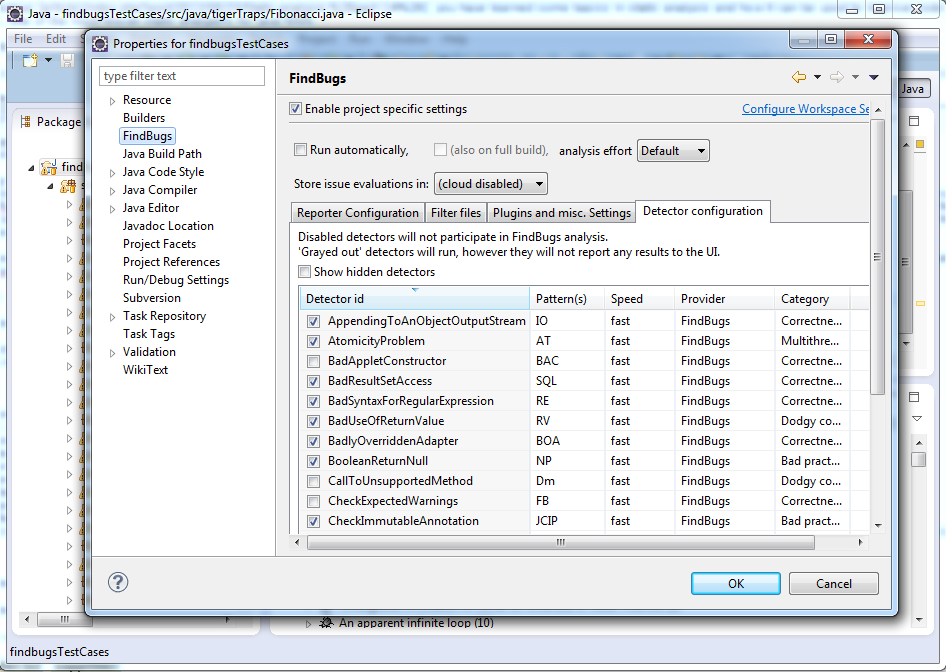
To work with project properties, you need to enable project specific settings. In the reporter configuration tab menu, you can select which types of bugs are reported. However, they are still enabled. To select specifically the detectors you want to run, you need to go in the detector configuration tab. Other menus enable to create filters for particular classes, and in plugin and misc settings, you can tune how to execute findbugs (extra job) and add external plugin detectors (however this doesn’t work very well, the best way is to build the plugin, I will explain this later).
FindBugs internals
In this section, you will learn some elements about FindBugs architecture. We’ll begin by exploring its source code then see how it works.
Building from source
FindBugs source code can be downloaded from google code. The svn repository contains in particular 3 folders: findbugs, eclipsePlugin, and eclipsePluginTest, which are necessary to build, run and test the eclipse plugin. Note that the folder plugins is also needed to build eclipsePlugin (NoUpdateCheck). Theses projects can be directly imported into the eclipse workspace. To build the findbugs plugin, just run ant build on build.xml (target dist). This will generate the distribution in the folder dist and compile all classes of findbugs et eclipsePlugin in bin_build.
To test and debug your plugin from eclipse, you can create a new Eclipse configuration from Run => Debug Configuration … => Eclipse Application => New Launch configuration. You can define the workspace location for the new runtime, and in the plug-ins menu, select the plugins to enable. In the list you will see the findbugs plugin in workspace.

You can know run/debug your plugin in this new Eclipse application.
Architecture
As you may see, the findbugs project contains over 1000 java classes in more than 50 packages, it can then be quite difficult at first to get through it. The main package is edu.umd.cs.findbugs: it contains the FindBugs class which is the main engine lauching the analysis, main model classes defining bugs (BugInstance, BugAnnotation) and detectors (Detector). In edu.umd.cs.findbugs.ba and sub-packages are all classes doing static analysis (ba stands for « Bytecode Analysis »). FindBugs uses the BCEL libray to manipulate binary Java class files. All of the implemented detectors can be found in edu.umd.cs.findbugs.detect.
Fundamental classes and interfaces:
- FindBugs2: main class (replacing FindBugs), orchestrates the analysis of a project.
- Project: represents the java project to be analysed : application classes (scanned classes), auxiliary classes (referenced in project but not scanned), source directories.
- IAnalysisCache: Interface for registering classes, performing analysis, and caching the results.
- ClassDescriptor / MethodDescriptor: identify the class / method to be analysed.
- Detector/Detector2: Interface implemented by all detectors, visits and inspects classes, then reports all the results at the end.
- ExecutionPlan/AnalysisPass: set the execution plan of findbugs, order detectors in the analysis passes. Defined in findbugs.xml
- BugInstance/BugAnnotation: represent the warning and its description.
- BugReporter: class in charge of reporting bugs (BugInstance).
- BugCollection: collection of BugInstance objects.
So, what happens when you execute FindBugs? First, the program reads the project to be analysed and discovers all the application classes. Then it loads the detectors and creates an execution plan defining the detectors to apply, their order through the analysis passes. Finally, it runs the detectors on the application classes following this algorithm:
for each analysis pass in the execution plan do
	for each application class do
			for each detector in the analysis pass do
				apply the detector to the class
			end for
	end for
end for
The analysis passes can be used to perform interprodecural analysis. Databases are used to relay collected information from a earlier detector to a later one.
Coming soon
After learning these basics about Findbugs, you will see in the next post how to write and add custom detectors, the tool’s modularity beeing one of its most interesting features.


